How to Round Corners in Canva: A Step-by-Step Guide
Rounding corners in Canva is a simple yet effective way to add a touch of sophistication and modernity to your designs. This graphic design tool offers user-friendly features that let designers of all skill levels create eye-catching visuals with ease. Customizing the corners of various elements, from images to shapes and text boxes, not only enhances the visual appeal but can also influence the overall feel and flow of your creation. With just a few clicks, you can transform sharp-edged graphics into softer, more polished elements that stand out on social media platforms or professional presentations.

Understanding how to effectively apply rounded corners in Canva can significantly improve the aesthetics of your designs. Canva's editor makes it straightforward to adjust corner properties such as radius size, offering extensive customization options to match your specific vision. Whether you're preparing graphics for a blog, designing a social media post, or creating a branding kit for your business, mastering the adjustment of corners is an invaluable skill. Through the application of advanced techniques and effects, users can finalize and export their Canva designs with confidence, knowing they've created something both unique and visually engaging.
Key Takeaways
- Rounding corners in Canva enhances the design's aesthetic and softens the overall look.
- Canva's editor allows for precise customization of corner properties to fit various design needs.
- Mastered corner adjustments can elevate the professionalism and appeal of exported designs.
Understanding Canva and Rounded Corners
Canva is a user-friendly graphic design tool that allows individuals to create a variety of visual content. One of the features within Canva is the ability for users to apply rounded corners to their designs, enhancing the visual appeal of shapes, images, and elements. Rounded corners are a styling choice that can give a softer and more modern look to the components of a design.
To apply corner rounding to a shape or image, users must:
Select their desired element within their Canva canvas.
Look for the 'Border Style' option which typically appears in the top bar when an element is selected.
Adjust the corner rounding using a slider or by entering a specific value.
By manipulating the corner rounding settings, designers can customize the degree to which corners are rounded, tailoring the visual impact to their requirements. Rounded corners can make designs feel friendlier and are often used in web and app design to give a more approachable aesthetic.
For images, rounding corners usually involves placing the image within a frame that already has rounded corners. Canva offers a variety of round corners frames that users can simply drag and drop their images into.
Shapes in Canva can also have their corners rounded by modifying their border properties. This simple adjustment can significantly alter the dynamic of a design, providing a tool for designers to effortlessly refine the aesthetics of their work.
For detailed guidance on how to achieve this effect, visit Canva Templates and Brendan Williams Creative. These resources offer step-by-step instructions to enhance designs with rounded corners.
Starting with Canva
To effectively round corners in Canva, one must first master the basics of starting a project and navigating the platform. This section covers the straightforward steps to create a new project and familiarize oneself with Canva's user-friendly interface, ensuring that even beginners can quickly get up to speed with the design tools.
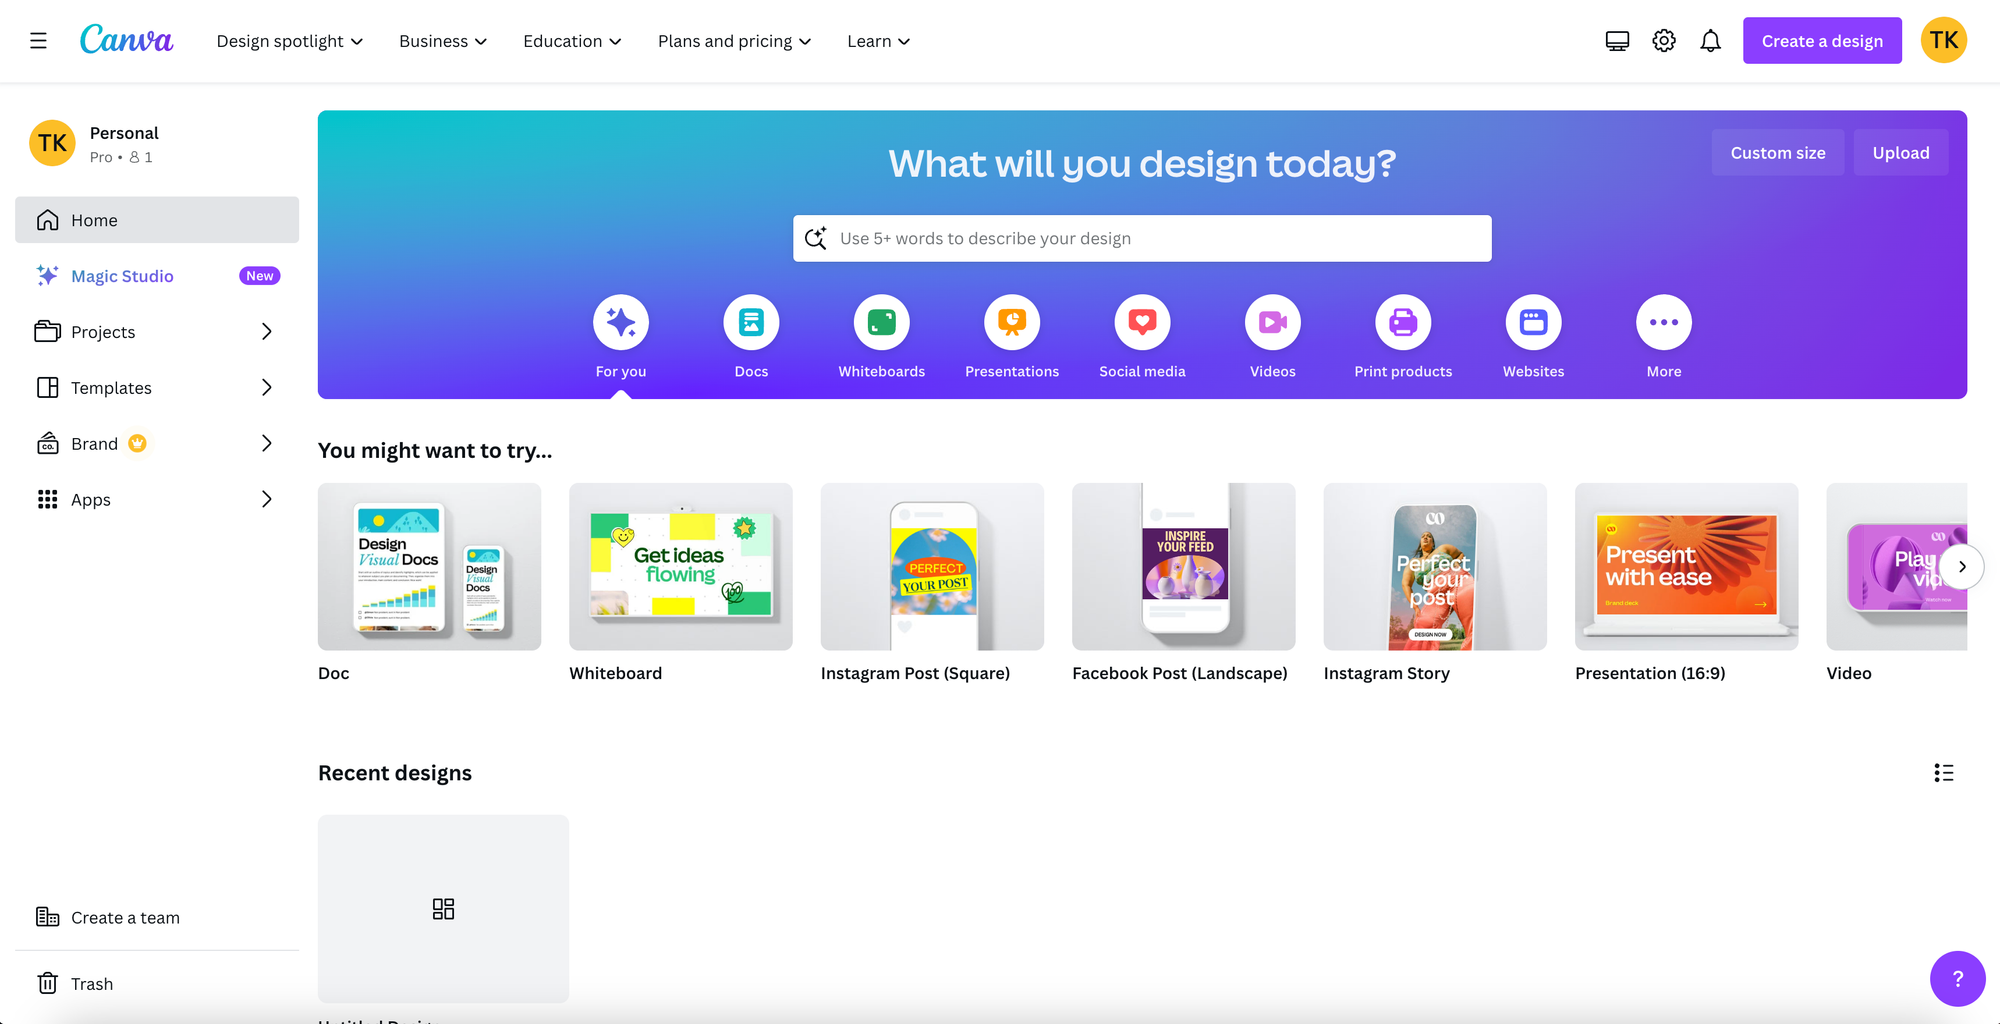
Creating a New Project
Users should begin by clicking the Create a Design button, prominently displayed often in the top right corner of the Canva homepage. This action initiates a new project. Canva offers various predefined canvas sizes tailored to different types of designs, such as social media posts, presentations, or custom dimensions based on the user's specific needs.
- Steps to Start a New Project:
- Click on Create a Design.
- Choose a predefined size or enter custom dimensions.
- The new project opens, and users can begin designing.
Navigating the Canva Interface
Once a project is open, Canva's interface presents a selection of design elements, tools, and features in a layout that's intuitive to use.
Sidebar: The left sidebar offers access to a range of elements such as text, backgrounds, shapes, and more. Users can simply drag and drop these into the canvas area.

Top Toolbar: The top toolbar changes contextually based on the selected element but generally provides options for styling, layer arrangement, and more.
Canvas Area: The central part of the screen is the canvas where the design comes to life. Click any object here to select and edit it using the top toolbar or corner handles for resizing.
By familiarizing themselves with these sections, users can intuitively combine and modify design elements, creating the desired look with ease.
Working with Shapes in Canva
In Canva, shapes are foundational elements that can enhance visual compositions. They serve various functions, from framing content to creating patterns or backgrounds.
Adding Shapes to Your Design
To add shapes to a design in Canva, users begin by selecting from a variety of basic figures such as rectangles, squares, and circles, as well as more complex forms. Upon choosing the desired shape, it's simply a matter of dragging and dropping it onto the canvas. Adjustments can be made to the size and proportions to fit the design's requirements.
Utilizing Built-In Shapes
Canva offers a selection of built-in shapes which can be easily incorporated into any project. These shapes range from geometric forms, like frames and circles, to more eclectic options that cater to a diverse array of design needs.
- To utilize a built-in shape:
- Click on the "Elements" tab.
- Type the name of the desired shape in the search bar or browse the shape library.
- Select the shape and it will appear on your canvas.
- Customize the color and transparency as needed.
Each shape in Canva can act as a frame, providing creative ways to present images. By selecting a shape with rounded corners, users can place images within to create softened edges, contributing to a more polished look in the final design.
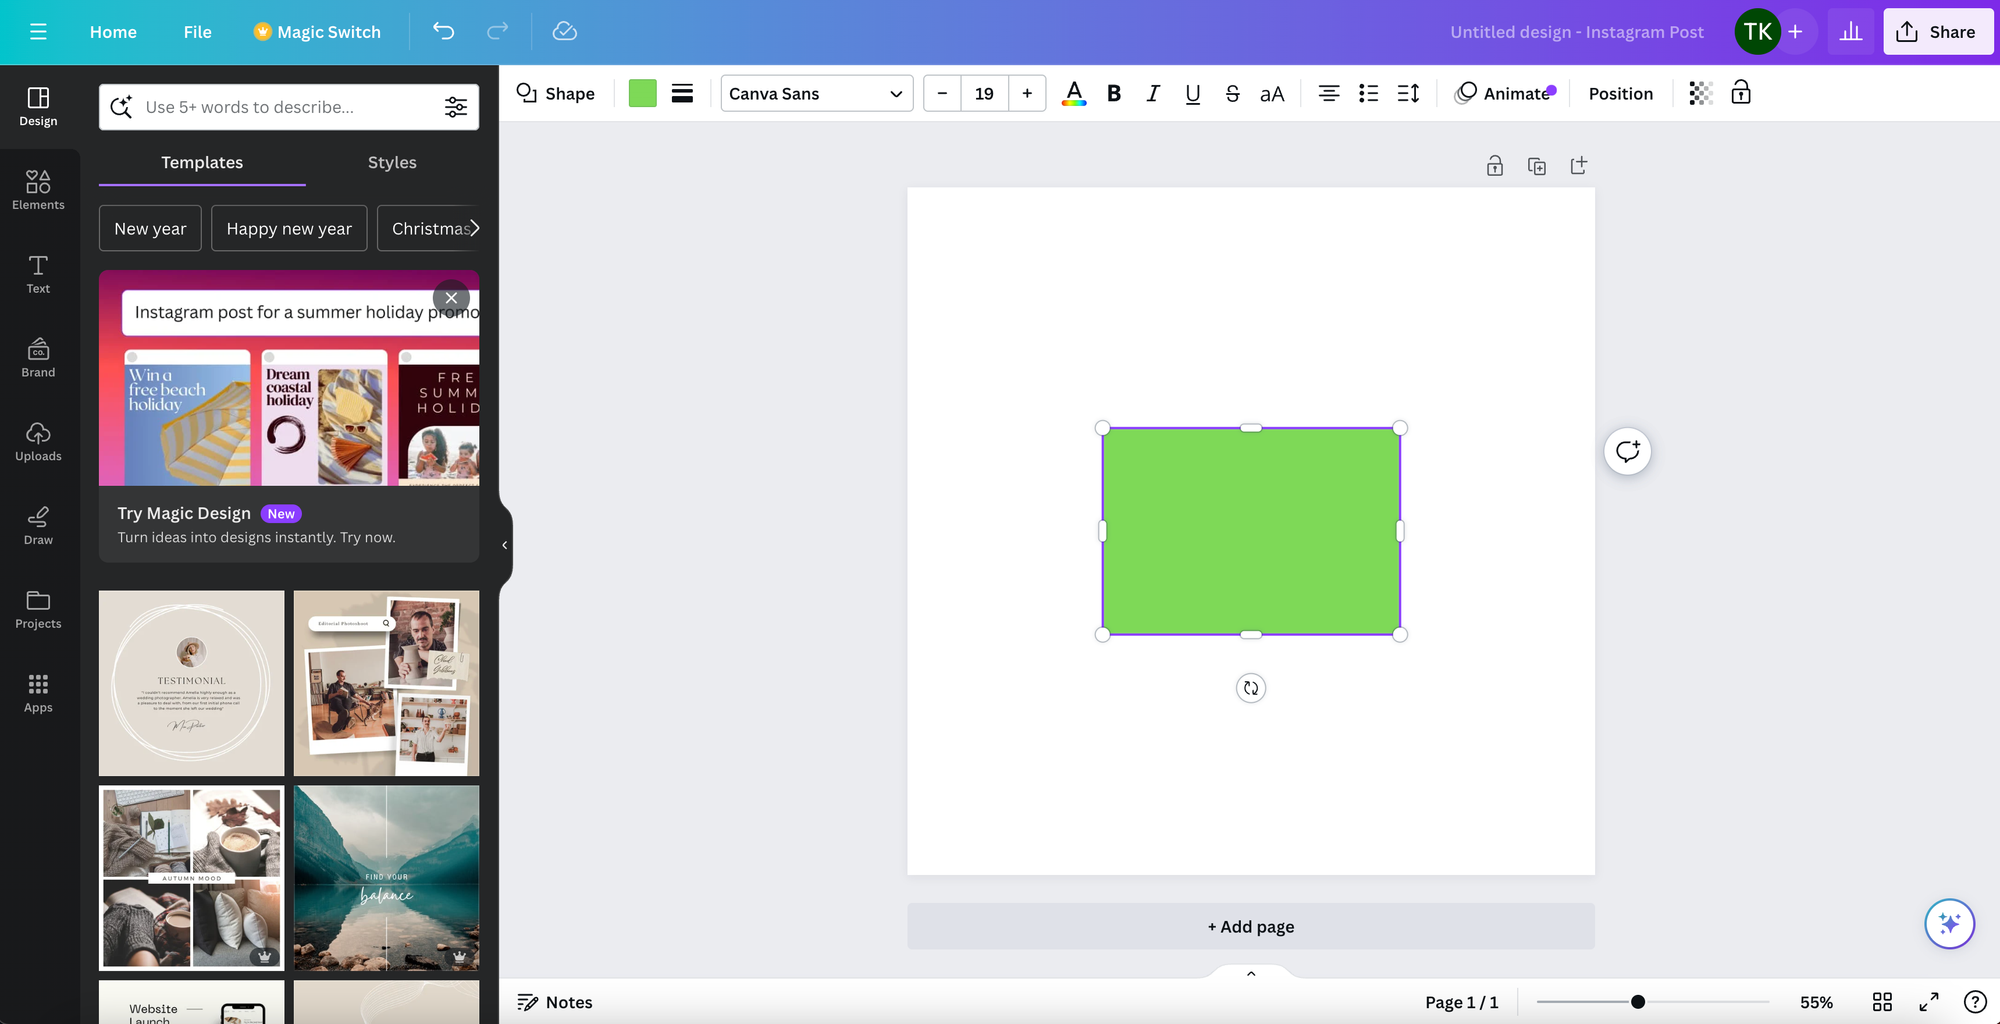
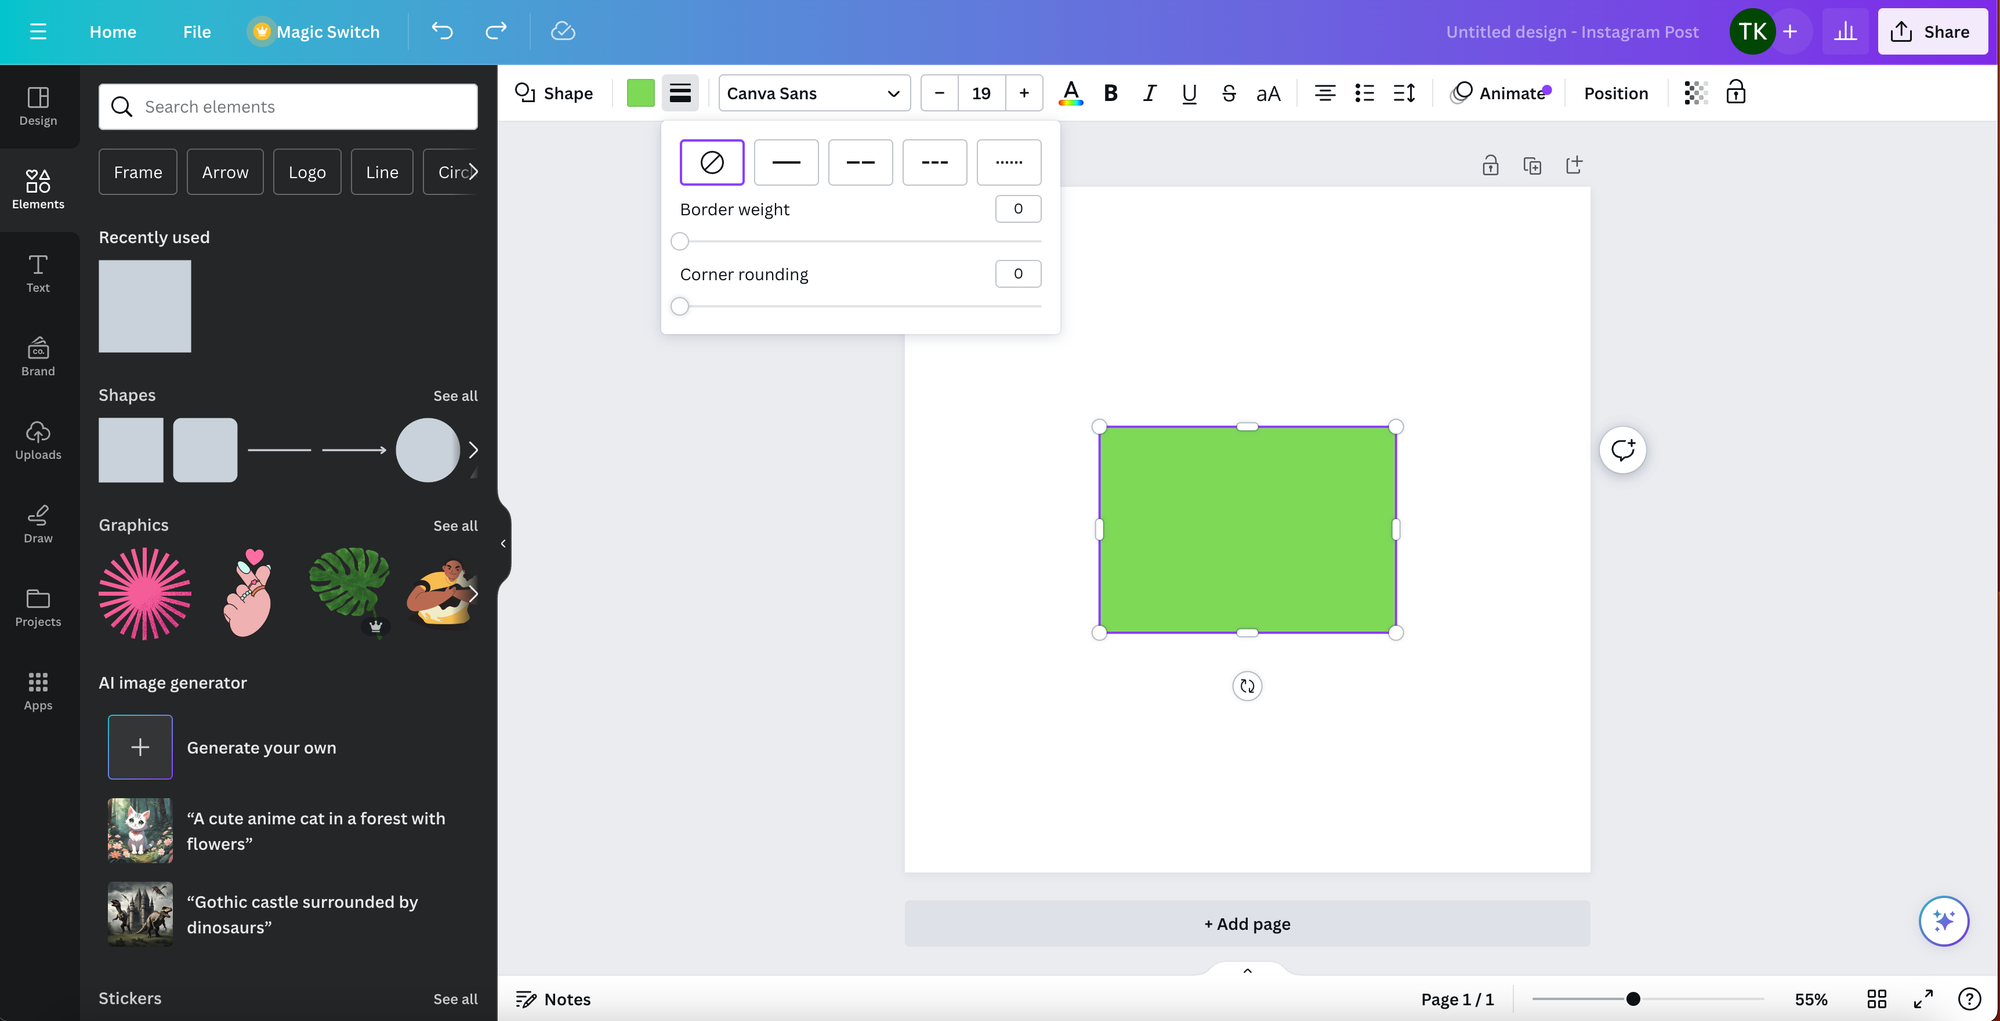
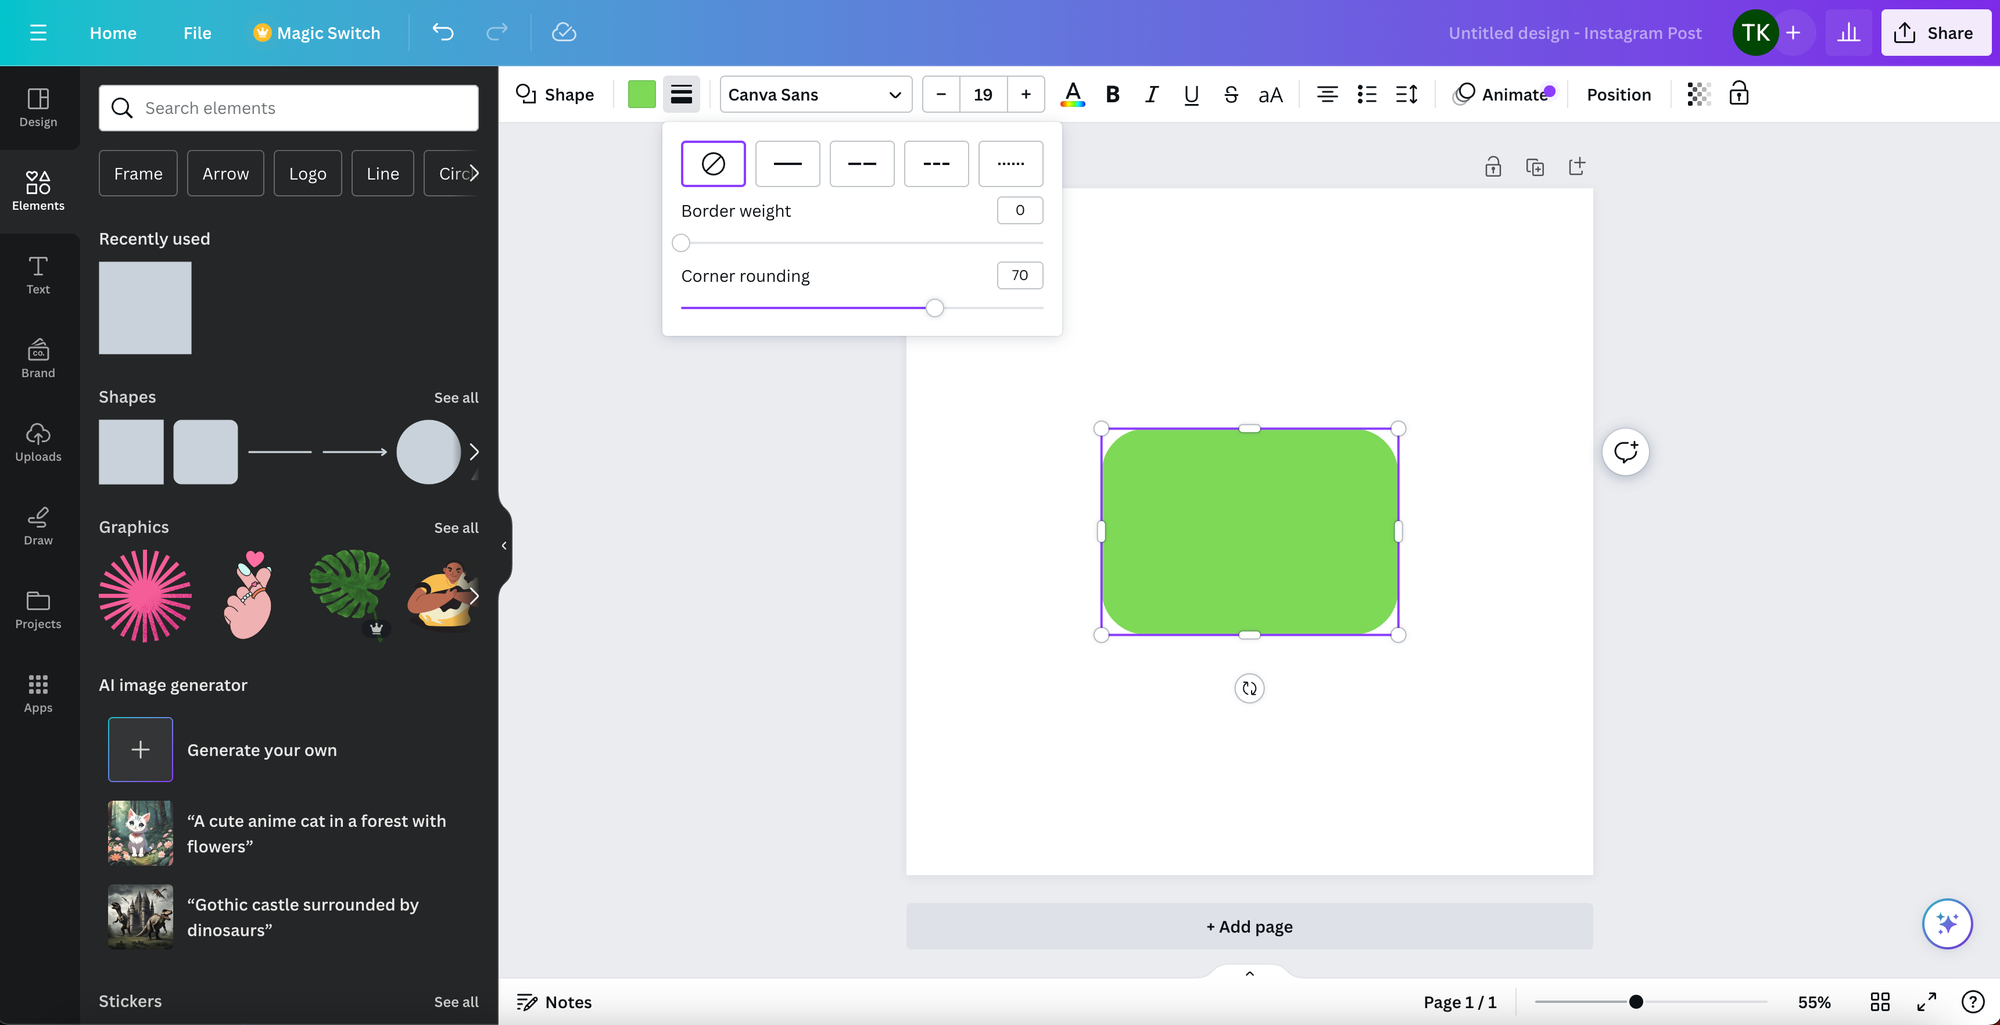
Adjusting Corners in Canva
Adjusting corners in Canva allows individuals to customize the softness of image and shape edges for a more polished design. This adaptation can significantly enhance the visual appeal of a graphic.
Applying Rounded Corners to Text Boxes
Applying rounded corners to text boxes in Canva adds a touch of sophistication to any design. Users can easily achieve this by following a few simple steps.
Firstly, navigate to the Elements section within Canva's interface. From there, locate the Frames collection. One should look specifically for Round Corner Frames—these are designed to give text boxes smooth, curved edges. Upon finding the desired frame, simply click to add it to the design.
After the rounded frame is placed, the next step involves embedding the text. Click on the Text tab to bring up various text options. Users should then drag a text box over the rounded frame, adjusting the size and position to fit within the borders. Additionally, font style, size, and color can be tweaked to enhance readability and aesthetic appeal.
An alternative method involves adjusting the corners of an existing text box. Some design platforms enable users to select the text box, look for the edge controls and manipulate a specific handle, often highlighted in orange, to curve the corners as desired.
Below is a summary of the steps:
- Open Canva and choose or create a design.
- Click on Elements and search for "Round Corner Frames."
- Select a frame and add it to the canvas.
- Click on Text to add a text box.
- Drag the text box over the frame, adjust size, and edit text.
These intuitive features allow for easy customization of text boxes, giving designs a more polished and rounded appearance.
Enhancing Design Aesthetics
When it comes to the visual appeal of designs, incorporating specific elements can significantly alter the perception of a creation. One of the salient features that contribute to design aesthetics is the treatment of corners and edges.
Incorporating Rounded Corners for Elegance
Designs that boast rounded corners tend to convey a sense of elegance and softness. This subtle modification can transform a regular image or shape into a more polished and aesthetically pleasing element. To achieve this, designers may use specific tools in Canva that allow for corner adjustments, ensuring that images or shapes blend seamlessly with the overarching design theme. Rounding the corners can mitigate the starkness of angles, offering a softer and more sophisticated look that complements a variety of design styles.
Using Rounded Edges for a Playful Look
On the other hand, rounded edges can also contribute to a more playful and approachable design aesthetic. In certain contexts, such curves may add a sense of fun and dynamism to the visual composition. Designers aiming for this appearance can incorporate shapes with rounded corners in Canva to infuse a design with an energetic and friendly vibe. These rounded elements work well in design projects targeting a youthful or casual audience, where a lighthearted touch is beneficial.
Advanced Techniques and Effects
When working with rounded corners in Canva, one can elevate their design by applying various effects and adjusting the degree of roundness. These techniques allow for the creation of unique visuals that can set designs apart.
Applying Effects to Rounded Corners
Applying effects to the rounded corners in Canva can add a touch of sophistication to any element. One can leverage frames with pre-applied effects such as shadows or glows. This not only enhances the visual appeal but also adds depth to the design. For instance, a drop shadow will give the perception that the element is slightly elevated from the canvas, creating a subtle 3D effect. Users should explore various effects to discover the ones that best suit their design objectives.
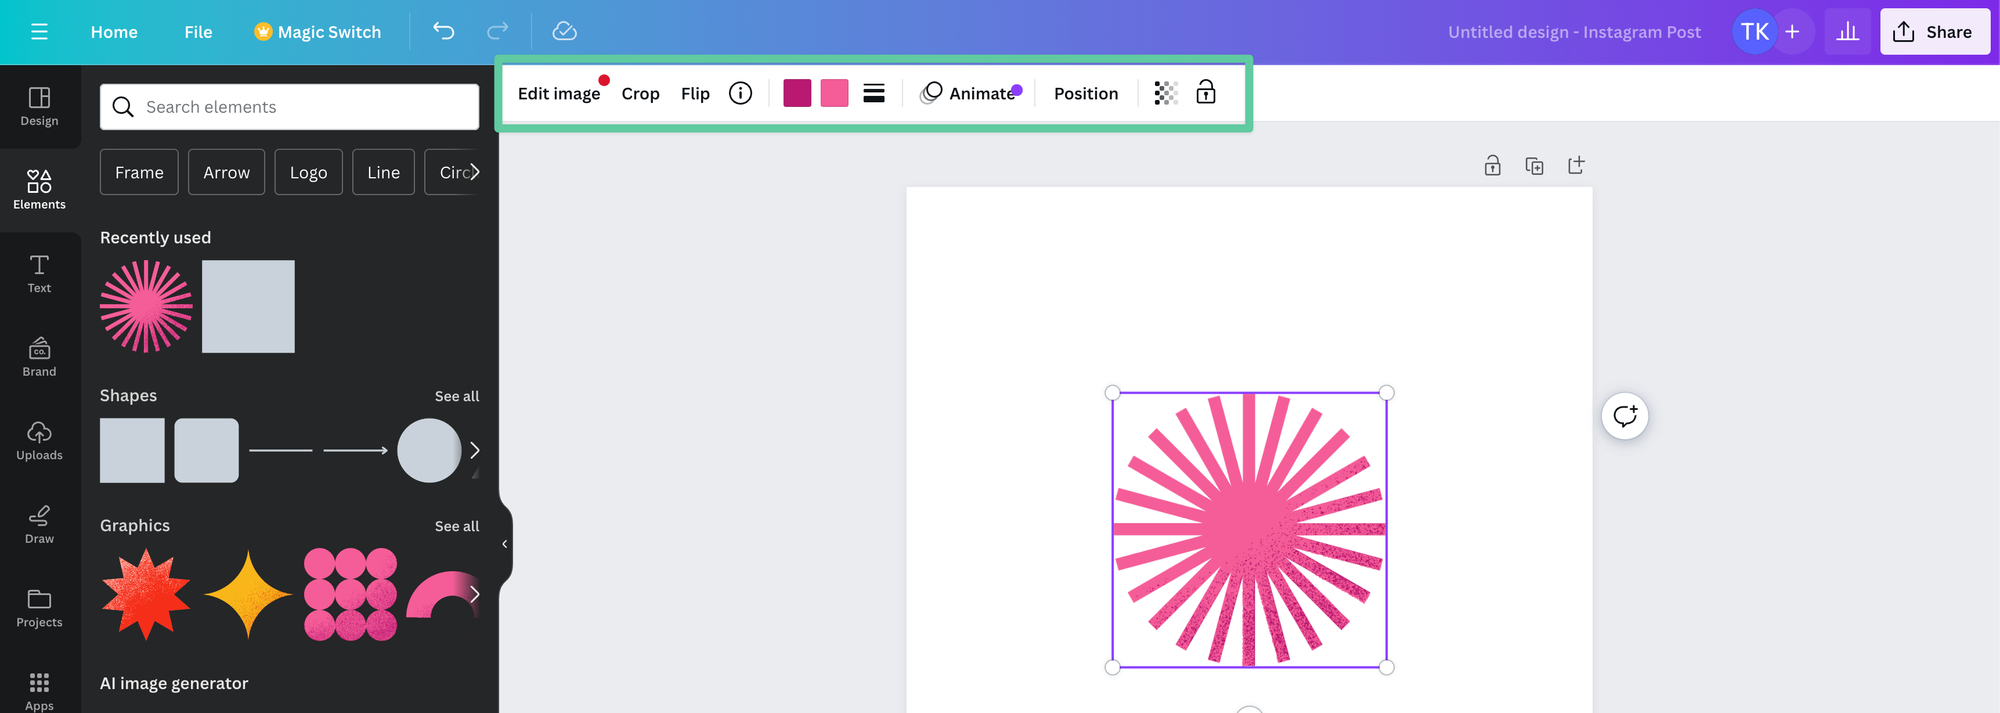
Adjusting Degree of Roundness
Adjusting the degree of roundness can drastically alter the look and feel of a design element. Canva allows easy alteration of corner roundness through a simple slider, or by inputting a specific pixel value for precise control. To adjust, one may:
- Select the element: Click on the object whose corners need rounding.
- Access the border option: Find the border option in the toolbar.
- Alter the roundness: Utilize the slider or enter a number to define the desired roundness.
By adjusting these values, designers can move from subtle curves to completely circular shapes, tailoring the visuals to convey the right message and style.
Finalizing and Exporting Your Canva Design
Before sharing or printing your Canva design, it's crucial to preview it for any final adjustments and then proceed to download it in the appropriate format for your needs.
Previewing Your Design
Once a design is complete, they can utilize Canva's built-in preview feature to see their work in full without the distraction of the editor's interface. It is an essential step to ensure that all elements are well-aligned and that the design is error-free. This step is especially important if the design is intended for print, such as a flyer, to avoid any costly mistakes.
Downloading Your Finished Design
After thoroughly previewing and ensuring the design meets their satisfaction, users can download their Canva design with ease. Canva offers multiple file formats, but for high-quality prints or digital displays, downloading as a PNG is recommended due to its balance of quality and file size. Users can select 'Download' from the top right corner and choose from the list of formats that best suits their end use—whether that's for online sharing or professional printing.
Frequently Asked Questions
In the realm of digital design, Canva offers tools for customizing images, such as rounding corners for a more polished look. Here are some common inquiries and their straightforward solutions.
What are the steps to create rounded corners on images using a design application?
One can easily round corners on images by selecting an element and using the border and corner editing options within the tool to adjust the curvature to the desired level.
Can you modify the edges of a photo to have rounded corners within an online design tool?
Yes, it is possible to modify the edges of a photo to have rounded corners using an online design tool by applying round corner frames or utilizing the border options to soften the edges.
What is the process to round off the edges of business cards in a graphic design platform?
To round off the edges of business cards in a graphic design platform, locate the border settings for the card's element and adjust the corner radius, visually transforming the sharp corners into a rounded finish.
Is there a feature to curve an image within a design application, and how is it used?
Many design applications include a feature to curve or round the corners of an image. This is typically found within the image's properties or border settings and is adjusted by setting the radius of the curve.
How can I make rounded corners for a PNG image using graphic software?
To add rounded corners to a PNG image in graphic software, you would select the image and then adjust the corner rounding through the image's style or border settings to achieve the desired roundness.
What method should be followed to round corners of videos with online tools?
The method to round corners of videos in online tools closely mirrors that of images; this involves selecting the video and utilizing the software's border editor to modify the corners to a rounded shape.